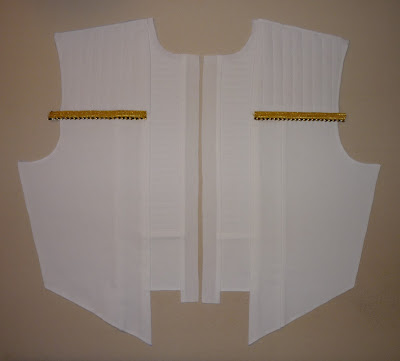
Press seam allowances open.
Sew or baste the seam allowances open about ½" from the top edge.
Using your zipper/piping foot, sew the front yoke to the front body assembly, right sides together and with ¾" seam allowance, matching edges and aligning the body panel seam line with the appropriate quilt line.
Press the yoke/body seam allowances upward.
Cut out the yoke/body seam allowances at the outer edges and as close to the seam line as possible.
Now cut out the yoke/body seam allowances another ⅝" along the centermost edge. (Seriously, these layers really start to add up! You want the finished garment to drape comfortably, not feel like wearing body armor.)
From the right side, using your quilting/walking foot, topstitch through all layers ⅛" above the yoke/body seam line to secure the yoke/body seam allowances.
(It's okay if the body seam doesn't perfectly align with the appropriate quilt line, as the intersection will be covered with the ⅝" braid/trim assembly later.)
 Sew the lower bib panel (piece C) to the bottom of the bib (piece B), right sides together, with ½" seam allowance. (The seam line should be directly over the bottommost bib quilt line.)
Sew the bib assembly to the body assembly, right sides together and with ⅝" seam allowance, aligning the yoke/body seam line with the appropriate bib quilt line and with the bottom of the bib assembly extending ⅜" past the line on the printed pattern. Leave the bottommost 1 ⅜" or so hanging free.
(Yes, that is correct; leave the bottommost portion of the bib un-sewn for now. We'll be finishing the stitch later in the construction process.)
Press the bib/body seam allowance toward the body (away from center).
Press under the free bottom of the bib assembly, as well as the centermost edge of the middle front body panel, under ⅝" as well.
Remove bulk (again) by cutting out the uppermost ¾" bib/front yoke seam allowances as close to the seam line as possible.
Clip the bib/body seam allowances horizontally directly beneath the quilted bib, as close to the seam line as possible.
Attaching the ⅝" trim assembly to the bottom of the yokes and shoulder points, you have two options: you can attach the ⅛" gold/black twisted piping first then topstitch the ½" gold braid/naval lace afterward, or you can sew the two together to form the finished length of trim and attach the trim assembly in one process.
We prefer the former method for the yoke and shoulder point trims, so that is the method we'll be demonstrating here. If you wish to use the latter method, see our bib/neckline trim section for our tips on sewing the two together.
The "one at a time" method we'll be using works best if your ⅛" gold/black twisted piping has ¼" lip.
If it doesn't, simply cut the lip down to size before beginning this process.
Cut a length of ⅛" gold/black twisted piping slightly wider than the bottom of your front yoke. Pin it to the jacket body so the edge of the lip is flush with the yoke/body seam line, and so that overhangs the armscye a bit and stops about ¼" from the body/yoke/bib intersection.
Using your zipper/piping foot, sew the piping to the jacket body, stitching close to the cord.
Cut a similar length of ½" gold braid/naval lace and center it over the yoke/body seam line.
Switch to your gold metallic/embroidery/Sulky thread and your metallic or topstitching needles.
TIP: Before attempting to attach your braid, experiment a bit on some scraps to determine which needle type and size works best with your particular combination of braid, thread, and material thickness.
For instance, on the physical spool of thread we used for our original DS9/NEM formal uniform, Sulky recommended using a particular size topstitching needle, but we actually found that the same size metallic needle worked better when attaching the ½" gold braid/naval lace to the garment.
However, on the updated DS9/NEM formal uniform we constructed for this tutorial, we used a different ½" gold naval lace than we used on our original, and we found that we got the best results when using a universal needle to attach the naval lace to the garment.
Once you've determined your most effective needle type and size, attach the ½" gold braid/naval lace to the jacket body (centered over the yoke/body seam line) with two rows of stitching: one near its upper edge, and one near its lower edge.
Apply liquid fray preventer liberally to the raw edges of the trim overhanging the armscye.
You may also wish to dab a little bit - not much - onto the other raw edge of the trim (the edge at the bib).
(Depending on your gold braid and piping, you may find that this stuff frays and/or unravels rapidly, so the idea with the overhang and liquid fray preventer is to keep it in good shape for as long as possible.)
Place the zipper trim on top of the bib assembly, right sides together, with top edges flush and with the centermost edge of the zipper trim flush with the center of the bib.
The zipper trim should extend beyond the bottom of the bib assembly by about 1". If your zipper trim overhangs more than this, cut off the excess.
Using your quilting/walking foot and white thread, sew the zipper trim to the bib assembly ⅜" from the center edge, leaving the bottommost 1" free.
Press the zipper trim toward center (away from the body).
Repeat for the other side.
PREVIOUS: Jacket Tutorial, part 2 - Quilting


No comments:
Post a Comment