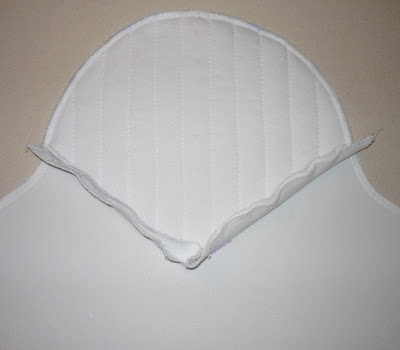
Stay-stitch the lower corner at the top of the sleeve, where the shoulder point will be attached, about ⅝" to ¾" from the edges, and clip the sleeve vertically from the corner to the stay-stitch's pivot point.
Using your zipper/piping foot, sew the shoulder point to the sleeve with ¾" seam allowance, with the open/raw edge of the trim flush with the upper edge of the sleeve.
TIP: Place a pin in the trim, vertically, where the "center" quilt line and miter are, to mark exactly where the pivot point of the shoulder point is, and align this pin with the clip on the sleeve. Stop stitching at the bottom of corner of the shoulder point (where the pin is), then, with the needle still in the fabric, lift the presser foot and rotate the sleeve so that the other sleeve edge is flush with the remainder of the trim, lower the presser foot, and continue stitching.
Once the shoulder point is attached, your sleeve may initially look something like this:
And you'll feel like this:
But don't worry! A sleeve even this "bad" can be salvaged with very little effort, and we'll show you how.
First, and perhaps most obviously, gently smooth the area with your hand a bit.
Flip the sleeve over so you're looking at the underside (right side down).
Steam and press the area directly beneath the corner of the shoulder point.
If steam doesn't get the job done, you may want to lightly spray a bit of water on the area and press it again.
See how much better it already looks?
Notch (cut out) the bottom corner of the shoulder point seam allowances.
Press the seam allowances upward.
Reduce bulk by cutting away the outermost ¾" shoulder point/sleeve seam allowances.
There, now, isn't that much better?!?
From the right side, using your quilting/walking foot, topstitch through all layers ⅛" above the shoulder point/sleeve seam line to secure the seam allowances.
On the duty uniforms of the area, as a finishing touch, we recommend interfacing the area directly beneath the bottom corner of the shoulder point to keep it looking nice, flat, and crisp.
We do NOT recommend doing this on the formal uniform sleeves! For some reason, the little interfacing rectangles are more easily visible on the formal jacket sleeves than on the duty uniforms' (even when using white); perhaps it's because the deep black wool gabardine revealed so little on screen (even seam lines were often difficult to see). Regardless, the ⅝" trim will cover any minor imperfections in the lower corner of the shoulder point area.
Nevertheless, if you wish to additionally stabilize the area, cut a small, rectangular piece of lightweight or midweight fusible interfacing (about 2" x 1" or so).
We recommend cutting it with pinking shears ("pinking" it), thus minimizing the effect of strong, linear imprints on the right side of the garment where the edges of the interfacing are, better obscuring them.
Make sure the fabric area beneath the shoulder point is wrinkle-free, then fuse the interfacing strip to the wrong side of the sleeve. We recommend placing one of the pinked wedges directly beneath the bottom corner of the shoulder point, as high as possible.
 |
| (Again, we do not recommend using this procedure on the formal jacket sleeves. But this is how it will look if you do.) |
Cut a length of ⅛" gold/black piping the length of your shoulder point/sleeve seam line plus an extra 1-2".
Pin the piping to the sleeve assembly with the upper edge of its ¼" lip flush with the shoulder point/sleeve seam line and extending past each edge at least ½". Turn the bottom corner as sharply as possible.
Using your zipper/piping foot, sew the piping to the sleeve, stitching close to the cord.
The shoulder point braid is a little tricky and may take some practice.
Cut a single piece of your braid long enough to run the entire lower length of your shoulder point plus 1-2".
Fold the two halves upward, forming the V shape of the shoulder point bottom. Excess will begin to rise.
Gently push said excess behind the strip, leaving only the folded edge showing.
Use the actual shoulder point as a guide, and, when the desired angle is reached, gently press into place on low heat until it holds the shape on its own relatively well.
The front should have a very nice, vertical mitered look:
And the excess should all be in the back (pressed toward the back of the sleeve).
Center the braid over the shoulder point/sleeve seam line, with its lower edge flush with the upper edge of the piping cord and its miter properly aligning with the "center" quilt line, then pin in place.
Using your gold thread and your needle of choice, topstitch the braid onto the sleeve assembly as before (with one row of stitching along the upper edge of the braid and another row along the bottom edge).
The vertical miter should, ideally, align exactly with the "center" quilt line.
Repeat for the other side.
This may take some practice before really getting the hang of it. We recommend using some inexpensive ½" trim and piping for practice before using your expensive materials.
Our very first try was hideous:
Our second try had a better miter, but it was pretty far off from the appropriate quilt line:
Just keep at it! Practice makes perfect!


No comments:
Post a Comment